【Golang】LINE Notifyで画像を送る
先日の記事では、LINE Notifyでメッセージを送りました。
今回は画像を送ってみます。
少し検索してみても、メッセージを送る記事ばかりで画像を送るのはあまりないですね。
LINE公式のSDKでもimageFileで検索しても、実装されていないようなので、自分で実装することにしました。
ハマったところ
LINE Notify API Documentにもやり方が書いてあるし、すぐできると思ったのですが、multipart/form-dataでハマりました。
LINE NotifyにSticker送信機能と画像アップロード機能が追加されました に書いてあるようにcurlで以下のように画像を送信できます。
$ curl -X POST https://notify-api.line.me/api/notify
       -H 'Authorization: Bearer YOUR_PERSONAL_ACCESS_TOKEN'
       -F 'message=test'
       -F 'imageFile=@/PATH/TO/IMAGE/cony.jpg'
curlした結果をパケットキャプチャ取得して、http streamを見てみると以下のようになってるんですね。
Content-Type: multipart/form-data; boundary=------------------------1ac14b01bb1c4782

--------------------------1ac14b01bb1c4782
Content-Disposition: form-data; name="message"

test
--------------------------1ac14b01bb1c4782
Content-Disposition: form-data; name="imageFile"; filename="sample.jpg"
Content-Type: image/jpeg

(略)
LINE Notify API Documentのリクエスト方法にmultipart/form-dataが書いてあるのは、ここで使うためだったようです。
Content-Type application/x-www-form-urlencoded OR multipart/form-data
恥ずかしながら、multipart/form-dataを使ったことがなかったので、調べたところ
[PRG]いまさら聞けないHTTPマルチパートフォームデータ送信
にわかりやすく書いてありました。
Content-Typeのフォーマットは以下で、boundaryで指定される文字列によって区切ってあげることで、複数のデータをhttpリクエスト中に付与できるようになっています。
Content-Type: multipart/form-data; boundary=「バウンダリ文字列」\r\n
golangには、標準のmime/multipartパッケージがあるので、こちらを利用します。さらに今回は、imageFileと独自ヘッダを付けたいので、
net/textprotoパッケージも使います。
実装
実装は以下です。
package main

import (
    "bytes"
    "errors"
    "image/jpeg"
    "image/png"
    "io"
    "mime/multipart"
    "net/http"
    "net/textproto"
    "os"
    "path/filepath"
)

var (
    URL = "https://notify-api.line.me/api/notify"
)

func main() {
    msg := "send an image"
    filename := "./tmp.jpg"
    accessToken := "<YOUR ACCESS TOKEN>"
    f, err := os.Open(filename)
    if err != nil {
        panic(err)
    }
    defer f.Close()

    c := &http.Client{}

    var b bytes.Buffer
    w := multipart.NewWriter(&b)

    fw, err := w.CreateFormField("message")
    if err != nil {
        panic(err)
    }
    if _, err = fw.Write([]byte(msg)); err != nil {
        panic(err)
    }

    part := make(textproto.MIMEHeader)
    part.Set("Content-Disposition", `form-data; name="imageFile"; filename=`+filename)

    img, format, err := checkImageFormat(f, filename)
    if err != nil {
        panic(err)
    }

    if format == "jpeg" {
        part.Set("Content-Type", "image/jpeg")
    } else if format == "png" {
        part.Set("Content-Type", "image/png")
    } else {
        panic("LINE Notify supports only jpeg/png image format")
    }

    fw, err = w.CreatePart(part)
    if err != nil {
        panic(err)
    }

    io.Copy(fw, img)
    w.Close() // boundaryの書き込み
    req, err := http.NewRequest("POST", URL, &b)
    if err != nil {
        panic(err)
    }

    req.Header.Set("Content-Type", w.FormDataContentType())
    req.Header.Set("Authorization", "Bearer "+accessToken)

    resp, err := c.Do(req)
    if err != nil {
        panic(err)
    }

    if resp.StatusCode != 200 {
        panic("failed to send image, get http status code: " + resp.Status)
    }
}

// checkImageFormat validates an image file is not illegal and
// returns image as io.Reader and file format.
func checkImageFormat(r io.Reader, filename string) (io.Reader, string, error) {
    ext := filepath.Ext(filename)

    var b bytes.Buffer
    if ext == ".jpeg" || ext == ".jpg" || ext == ".JPEG" || ext == ".JPG" {
        ext = "jpeg"
        img, err := jpeg.Decode(r)
        if err != nil {
            return nil, "", err
        }

        if err := jpeg.Encode(&b, img, &jpeg.Options{Quality: 100}); err != nil {
            return nil, "", err
        }
    } else if ext == ".png" || ext == ".PNG" {
        ext = "png"
        img, err := jpeg.Decode(r)
        if err != nil {
            return nil, "", err
        }

        if err = png.Encode(&b, img); err != nil {
            return nil, "", err
        }
    } else {
        return nil, "", errors.New("Image format must be jpeg or png")
    }

    return &b, ext, nil
}
sdkにしたものはGithubに上げてあります。 使い方はREADMEに記載しています(LINE -> 画像を送る)。
References
- GolangでLINE Notify - 逆さまにした
- line-bot-sdk-go
- LINE Notify API Document
- LINE NotifyにSticker送信機能と画像アップロード機能が追加されました
- [PRG]いまさら聞けないHTTPマルチパートフォームデータ送信
- golang の mime/multipart で独自の Content-Type を付ける。
- golang POST data using the Content-Type multipart/form-data - stackoverflow
- mime/multipart - The Go Programming Language
- net/textproto - The Go Programming Language
歴代の年始め最初に発表されたCVE(1999〜2018)をスクレイピングする
Googleスプレッドシートでのスクレイピングがとても便利なので、 題材としてNISTから1999年以降毎年最初に発表されたCVE(CVE-yyyy-0001)の descriptionを抜き出してみました。
やり方
IMPORTXML関数を使うだけです。簡単かつ強力でした。
フォーマットはIMPORTXML(URL, XPATH)です。
XPATHの記法は以下を参考にしました。
XPATHは、Chromeの要素を検証からCopy XPathでうまくいく場合もありますが、
NISTのページではうまくいかず。ちゃんと理解するの大切ですね。
今回の場合は、以下の実装としました。
=IMPORTXML(URL,"//p[@data-testid='vuln-description']")
結果
| ID | 内容 |
|---|---|
| CVE-1999-0001 | ip_input.c in BSD-derived TCP/IP implementations allows remote attackers to cause a denial of service (crash or hang) via crafted packets. |
| CVE-2000-0001 | RealMedia server allows remote attackers to cause a denial of service via a long ramgen request. |
| CVE-2001-0001 | cookiedecode function in PHP-Nuke 4.4 allows users to bypass authentication and gain access to other user accounts by extracting the authentication information from a cookie. |
| CVE-2002-0001 | Vulnerability in RFC822 address parser in mutt before 1.2.5.1 and mutt 1.3.x before 1.3.25 allows remote attackers to execute arbitrary commands via an improperly terminated comment or phrase in the address list. |
| CVE-2003-0001 | Multiple ethernet Network Interface Card (NIC) device drivers do not pad frames with null bytes, which allows remote attackers to obtain information from previous packets or kernel memory by using malformed packets, as demonstrated by Etherleak. |
| CVE-2004-0001 | Unknown vulnerability in the eflags checking in the 32-bit ptrace emulation for the Linux kernel on AMD64 systems allows local users to gain privileges. |
| CVE-2005-0001 | Race condition in the page fault handler (fault.c) for Linux kernel 2.2.x to 2.2.7, 2.4 to 2.4.29, and 2.6 to 2.6.10, when running on multiprocessor machines, allows local users to execute arbitrary code via concurrent threads that share the same virtual memory space and simultaneously request stack expansion. |
| CVE-2006-0001 | Stack-based buffer overflow in Microsoft Publisher 2000 through 2003 allows user-assisted remote attackers to execute arbitrary code via a crafted PUB file, which causes an overflow when parsing fonts. |
| CVE-2007-0001 | The file watch implementation in the audit subsystem (auditctl -w) in the Red Hat Enterprise Linux (RHEL) 4 kernel 2.6.9 allows local users to cause a denial of service (kernel panic) by replacing a watched file, which does not cause the watch on the old inode to be dropped. |
| CVE-2008-0001 | VFS in the Linux kernel before 2.6.22.16, and 2.6.23.x before 2.6.23.14, performs tests of access mode by using the flag variable instead of the acc_mode variable, which might allow local users to bypass intended permissions and remove directories. |
| CVE-2009-0001 | Heap-based buffer overflow in Apple QuickTime before 7.6 allows remote attackers to cause a denial of service (application termination) and possibly execute arbitrary code via a crafted RTSP URL. |
| CVE-2010-0001 | Integer underflow in the unlzw function in unlzw.c in gzip before 1.4 on 64-bit platforms, as used in ncompress and probably others, allows remote attackers to cause a denial of service (application crash) or possibly execute arbitrary code via a crafted archive that uses LZW compression, leading to an array index error. |
| CVE-2011-0001 | Double free vulnerability in the iscsi_rx_handler function (usr/iscsi/iscsid.c) in the tgt daemon (tgtd) in Linux SCSI target framework (tgt) before 1.0.14, aka scsi-target-utils, allows remote attackers to cause a denial of service (memory corruption and crash) and possibly execute arbitrary code via unknown vectors related to a buffer overflow during iscsi login. NOTE: some of these details are obtained from third party information. |
| CVE-2012-0001 | The kernel in Microsoft Windows XP SP2, Windows Server 2003 SP2, Windows Vista SP2, Windows Server 2008 SP2, R2, and R2 SP1, and Windows 7 Gold and SP1 does not properly load structured exception handling tables, which allows context-dependent attackers to bypass the SafeSEH security feature by leveraging a Visual C++ .NET 2003 application, aka "Windows Kernel SafeSEH Bypass Vulnerability." |
| CVE-2013-0001 | The Windows Forms (aka WinForms) component in Microsoft .NET Framework 1.0 SP3, 1.1 SP1, 2.0 SP2, 3.0 SP2, 4, and 4.5 does not properly initialize memory arrays, which allows remote attackers to obtain sensitive information via (1) a crafted XAML browser application (XBAP) or (2) a crafted .NET Framework application that leverages a pointer to an unmanaged memory location, aka "System Drawing Information Disclosure Vulnerability." |
| CVE-2014-0001 | Buffer overflow in client/mysql.cc in Oracle MySQL and MariaDB before 5.5.35 allows remote database servers to cause a denial of service (crash) and possibly execute arbitrary code via a long server version string. |
| CVE-2015-0001 | The Windows Error Reporting (WER) component in Microsoft Windows 8, Windows 8.1, Windows Server 2012 Gold and R2, and Windows RT Gold and 8.1 allows local users to bypass the Protected Process Light protection mechanism and read the contents of arbitrary process-memory locations by leveraging administrative privileges, aka "Windows Error Reporting Security Feature Bypass Vulnerability." |
| CVE-2016-0001 | REJECT DO NOT USE THIS CANDIDATE NUMBER. ConsultIDs: none. Reason: The CNA or individual who requested this candidate did not associate it with any vulnerability during 2016. Notes: none. |
| CVE-2017-0001 | The Graphics Device Interface (GDI) in Microsoft Windows Vista SP2; Windows Server 2008 SP2 and R2 SP1; Windows 7 SP1; Windows 8.1; Windows Server 2012 Gold and R2; Windows RT 8.1; and Windows 10 Gold, 1511, and 1607 allows local users to gain privileges via a crafted application, aka "Windows GDI Elevation of Privilege Vulnerability." This vulnerability is different from those described in CVE-2017-0005, CVE-2017-0025, and CVE-2017-0047. |
| CVE-2018-0001 | A remote, unauthenticated attacker may be able to execute code by exploiting a use-after-free defect found in older versions of PHP through injection of crafted data via specific PHP URLs within the context of the J-Web process. Affected releases are Juniper Networks Junos OS: 12.1X46 versions prior to 12.1X46-D67; 12.3 versions prior to 12.3R12-S5; 12.3X48 versions prior to 12.3X48-D35; 14.1 versions prior to 14.1R8-S5, 14.1R9; 14.1X53 versions prior to 14.1X53-D44, 14.1X53-D50; 14.2 versions prior to 14.2R7-S7, 14.2R8; 15.1 versions prior to 15.1R3; 15.1X49 versions prior to 15.1X49-D30; 15.1X53 versions prior to 15.1X53-D70. |
【メモ】仮想通貨のハッシュ関数に求められる性質について
自分の頭の中を整理するために調べたり、考えたりしたメモ書きです。 備忘としてこちらに残すことにします。
全射性/単射性について
順列の最小完全ハッシュ関数に書いてあるように、全射性も単射性も必須ではない。
全射
def: が全射
射影した先(上記のB)に射影されない元があっても問題ない。
ただし、実装上は終域の大きさは小さくしたいので、全射だとうれしい。
単射
def: が単射
単射が満たされないことによって、いわゆる衝突が起こる。つまり、defの上段について、
が反例となる。
→ハッシュ衝突がないハッシュ関数は、完全ハッシュ関数という。 さらに終域Bが最小になるような場合を最小完全ハッシュ関数といい、このときは全単射になる。
いいハッシュ関数とは
Wikipediaに挙げられている特性と、仮想通貨で求められる特性とを比較し、まとめると以下表の通り。
| 特性 | 内容 | 仮想通貨では? |
|---|---|---|
| 低コスト | 計算コストが低いこと | PoWでは、ある程度の計算コストが要求される(計算コストが大きいことで、改竄に対する耐性を実現している) |
| 決定性 | 同じ入力であれば同じ出力 | 同じく求められる |
| 一様性 | 一様分布に近いこと | 同じく求められる |
| 可変な値域 | 値域が拡張できること | SHA-256からSHA-512にしたいときなどには求められる |
| 連続性 | 類似した入力は、類似した出力 (線形探索したい場合には有用) |
逆に全く違う値であることが求められる |
仮想通貨で考えるのに適しているのは、暗号学的ハッシュ関数 でWikipediaから引用すると要求事項は、以下の通り。
一般には以下の特性が必要
原像計算困難性
ハッシュ値からもとのキーを見つけることが困難であること
第2原像計算困難性
h(k) = h(k')となるようなk'が見つけることが困難であること
弱衝突耐性とも。
第2原像計算困難性では、kが与えられている前提での攻撃、つまり、攻撃対象のkと同じハッシュ値を持つk'を見つける攻撃に対して困難性があることを要求している
強衝突耐性
h(k) = h(k')となるようなk, k'が見つけることが困難であること
強衝突耐性では、任意のkとk'に対して、同じハッシュ値を持つ入力を見つける攻撃に対して困難性があることを要求している。誕生日のパラドックスで言及されるように、こちらのほうが計算量は少ない(一般には、終域のサイズを2倍にする必要がある)
計算コストについて
仮想通貨の文脈では、ASIC耐性として、単位金銭あたりのハッシュレートに差がないことも求められる。 要は、同じハッシュ計算(主流はSHA-256)するのに、CPU、GPU、ASICで計算するのに掛かる金銭コストが異なるのが不平等だという点。 特にASICは、寡占状態という指摘もあるよう。
Cuckoo Cycleでは、memory-boundなアルゴリズムにすることで、この不平等さを解消しようとしている。
paper読んだらまとめたい。
References
GolangでFacebook feedを取得するSDKを書いた
bot作りに精を出している今日このごろ、Facebookのfeedが更新されたら通知するbotを作ろうと思い、自分用のfeed取得SDKを作ったので使い方をまとめます。
今のところGetFeedという関数しかないです。
Install
どちらも自作になってしまいますが、以下2つをgo getします。
go get github.com/cipepser/bots
go get github.com/cipepser/httpclient/sdk
アクセストークンの設定
Feedを取得するためには、アクセストークンが必要です。そのためにfacebook for developersでappを作成してください。
curlでFacebook API叩くまでがわりとめんどかったのでメモ - DRYな備忘録を参考にさせて頂きました。
appを作成するとアクセストークンがここから確認できます。
以下の黒く塗り潰している箇所のApp Tokenです。
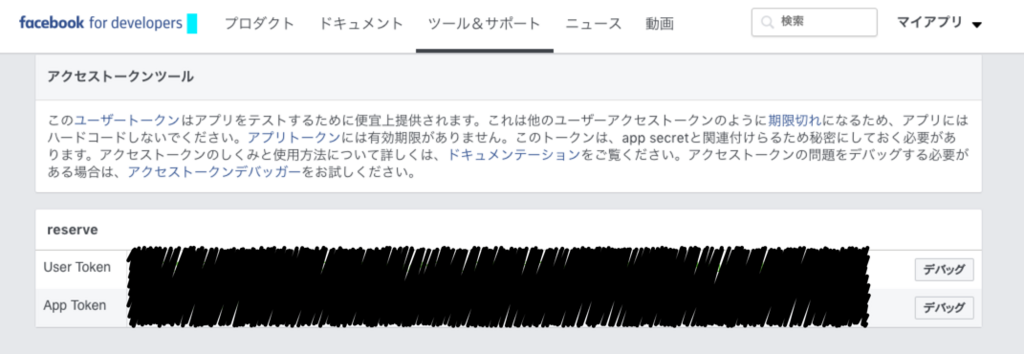
App Tokenをコピーし、./token/facebook_api.jsonに以下のように設定してください。
{
  "access_token":"<YOUR APP TOKEN>"
}
これで準備は完了です。
How to Use
URLに取得したいfeedのURLを入力し、GetFeed(URL)を実行するだけです。
package main

import (
    "github.com/cipepser/bots/facebook"
)

func main() {
  URL := "https://graph.facebook.com/v2.11/<user name>/feed"

  f, err := facebook.GetFeed(URL)
  if err != nil {
    panic(err)
  }

  fmt.Println(f)

}
結果(上記のf)は、facebookパッケージの中で定義している以下のFeed型で返ってくるので、必要なものを利用できます。
type Feed struct {
    Data []struct {
        CreatedTime string `json:"created_time"`
        Message     string `json:"message"`
        ID          string `json:"id"`
        Story       string `json:"story,omitempty"`
    } `json:"data"`
    Paging struct {
        Cursors struct {
            Before string `json:"before"`
            After  string `json:"after"`
        } `json:"cursors"`
        Next string `json:"next"`
    } `json:"paging"`
}
実装について
実装の中身はGithubにあげてあります。
access_tokenを埋め込んで、HTTPでGETするだけなので、応用しやすいです。
References
GolangでLINE Notify
LINEのBOTをDeveloper Trialのときに遊んで以来、ご無沙汰だったのですが、改めてLINE Notifyを試したらものすごく手軽でした。 ぐぐってみるとherokuにデブロイする系の記事が多いのですが、HTTPでPOSTするだけで通知できるので、備忘がてら手順をまとめたいと思います。
アクセストークンの取得
LINE Notifyの画面からログインします。 ログイン後、マイページへ移動します。

下の方に「アクセストークンの発行(開発者向け)」という項目があるので、 「トークンを発行する」を押下します。

すると以下の画面が出てくるので、
を入力します。
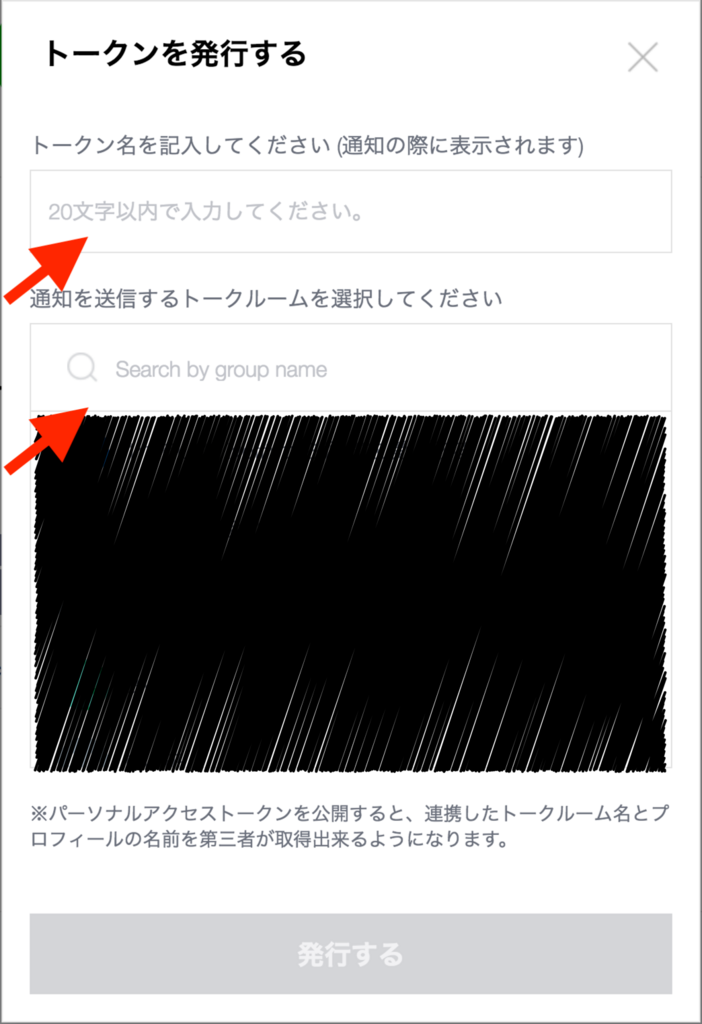
トークン名は、通知されるときにメッセージの先頭に付与されるので短めがおすすめです。
また、グループなどに通知したい場合は、先にグループを作っておく必要があります。 今回は「テスト」を事前に作っておきました。

「発行する」を押下すると以下のようにアクセストークンが得られます。

これをコピーしておきましょう。なくしてしまった場合は、もう一度同じ手順で発行します。
LINE Notifyアカウントをトークンルームに追加
アクセストークンを発行すると以下のように通知が来ます。

指示通りトークルーム(今回は「テスト」グループ)にLINE Notifyのアカウント(トークン名「bot」ではなく、LINE Notifyなので注意)を招待してあげます。

これで準備完了です。
メッセージを送る
実装は以下です。msgの内容を送信します。
package main

import (
    "fmt"
    "io/ioutil"
    "log"
    "net/http"
    "net/url"
    "strings"
)

func main() {
    accessToken := <YOUR ACCESS TOKEN>
    msg := "テストメッセージ"

    URL := "https://notify-api.line.me/api/notify"

    u, err := url.ParseRequestURI(URL)
    if err != nil {
        log.Fatal(err)
    }

    c := &http.Client{}

    form := url.Values{}
    form.Add("message", msg)

    body := strings.NewReader(form.Encode())

    req, err := http.NewRequest("POST", u.String(), body)
    if err != nil {
        log.Fatal(err)
    }

    req.Header.Set("Content-Type", "application/x-www-form-urlencoded")
    req.Header.Set("Authorization", "Bearer "+accessToken)

    _, err := c.Do(req)
    if err != nil {
        log.Fatal(err)
    }
}
実行すると以下のようにメッセージを受信できます。

References
Karabiner11.4.0で「ctrl+かな」を「ESC」にバインドする
Karabinerを11.4.0にアップデートしたら、今までprivate.xmlに設定してきたkey bindingsが使えなくなってしまいました。公式のマニュアルやKarabiner-Elementsの設定項目をまとめましたを参考にしながら、「ctrl+かな」を「ESC」にバインドする設定をしたので残します。
前回の記事は、complex_modificationsをインポートしましたが、自分で設定するのが今回です。
環境
macOS High Sierra ver 10.13.2
JIS keyboard
Karabiner-Elements-11.4.0
設定ファイル
設定ファイルがxmlからjsonに変わり、配置も~/.config/karabinerに変わっています。
❯ tree
.
├── assets
│   └── complex_modifications
│       └── hoge.json
└── karabiner.json
karabiner.jsonは、メインのconfigファイルで、変更があれば自動でリロードされるそうです。
assets/complex_modificationsは、その名の通りcomplex_modificationsを設定するディレクトリで、この中にjsonファイルを格納します。
設定
assets/complex_modifications配下にctrl-kana-to-esc.jsonを作成し、以下の内容を記載します。
{
    "title": "Change ctrl+KANA to ESC",
    "rules": [{
        "description": "Change ctrl+KANA key to Escape key",
        "manipulators": [{
            "type": "basic",
            "from": {
                "key_code": "japanese_kana",
                "modifiers": {
                    "mandatory": ["control"]
                }
            },
            "to": [{
                "key_code": "escape"
            }]
        }]
    }]
}
あとはこの設定を適用してあげれば完了です。

最後に
private.xmlよりも簡単に設定できるようになったように感じました。PreferencesのLogタブでエラーが見れるのでデバッグも捗ります。
References
KarabinerのSimple Vi ModeをHigh Sierraでも使う
Karabinerが使えなくなると聞いていたので、ずっとHigh Sierraにアップデートするのを渋っていたのですが、ついにアップデートしました。渋っている間に対応が済んでおり、Simple Vi Modeも使えたので、設定方法をまとめます。
環境
macOS High Sierra ver 10.13.2
Karabiner-Elements-11.4.0
手順
Karabiner-Elementsを起動し、Complex Modificationsタブを選びます。
出てきた画面でAdd ruleを押下します。
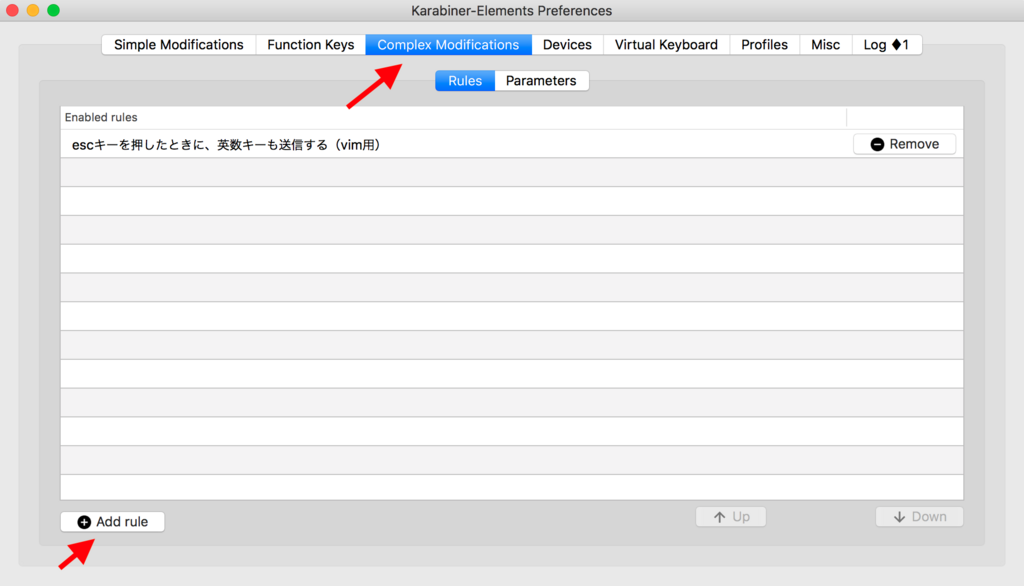
上のほうにあるImport more rules from the Internet (open a web browser)を押下します。
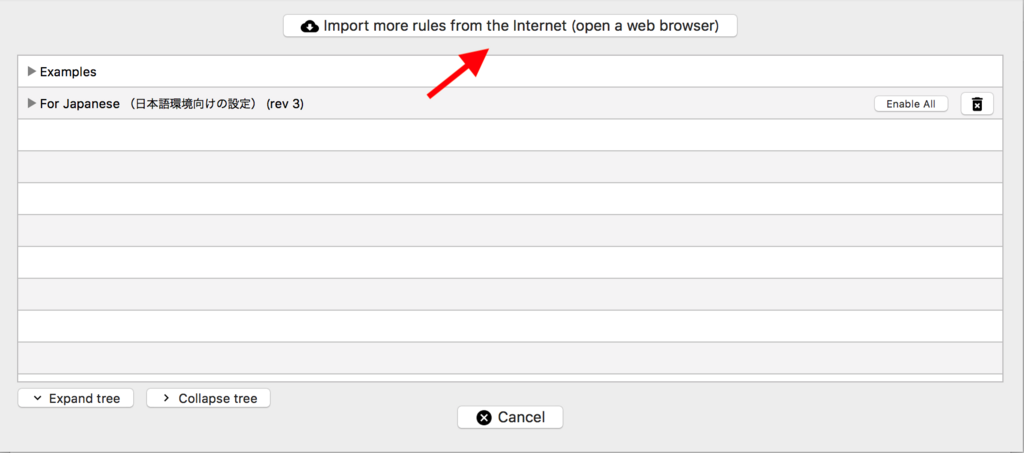
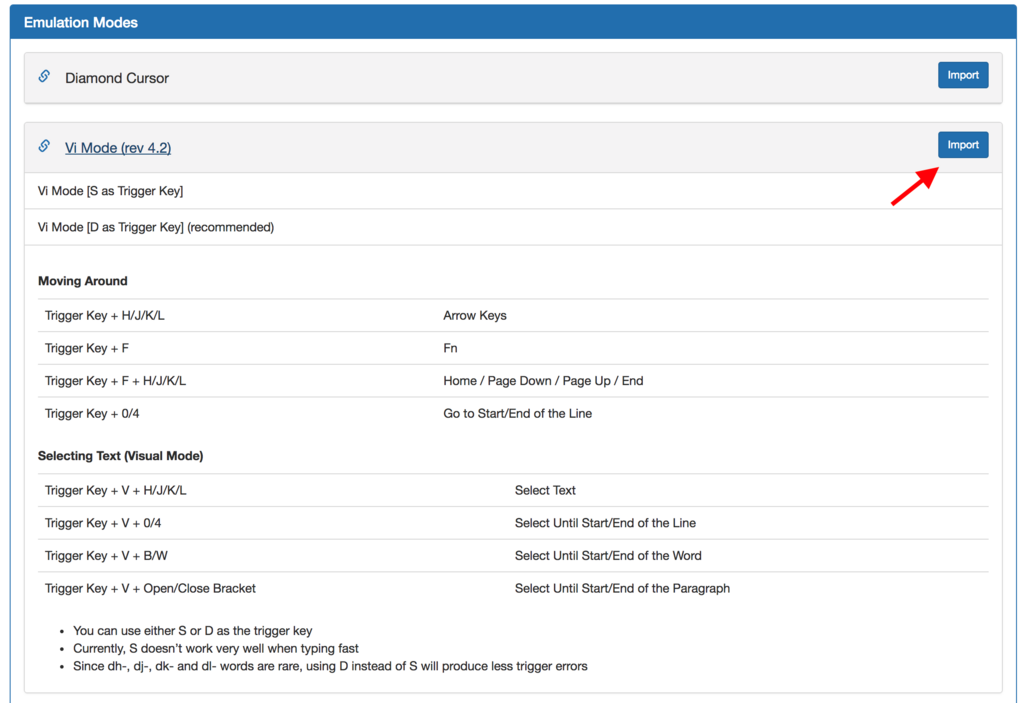
ブラウザが立ち上がるので、Emulation Modesの項目のVi Mode (rev 4.2)をImportします。
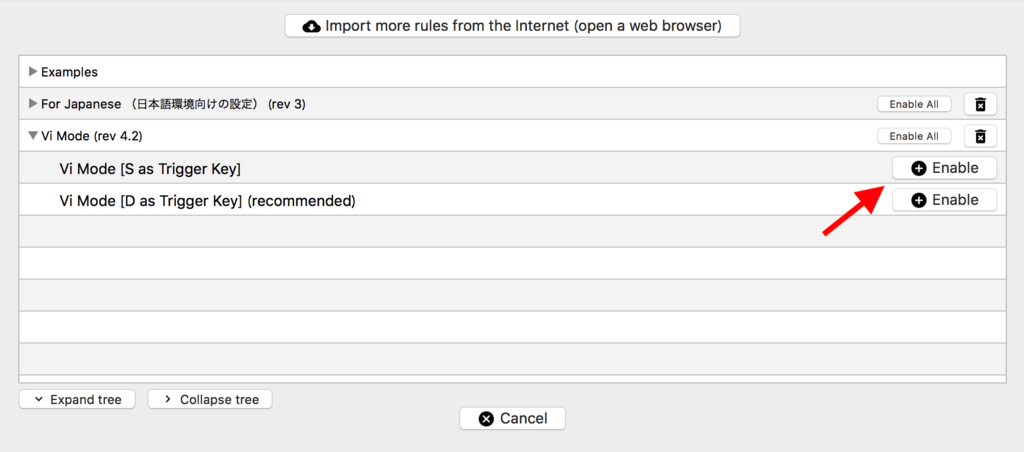
Karabiner-Elementsに戻ってくるのでImportを押下します。

最後にVi Mode [S as Trigger Key]のEnableで有効化して完了です。
簡単ですね。